2 min read
What is the best fuel type for lawn mowers and small engines?
Looking for the best lawn mower gas or fuel for your outdoor power equipment? Briggs & Stratton experts share their tips for choosing the right...
4 min read

Rebuilding the carburetor may be required if basic adjustments don’t fix your small engine problems or improve performance on your lawn mower or outdoor power equipment. Follow the steps below for overhauling small engine carburetors.
![]() WARNING: Always read the engine and equipment manual(s) before starting, operating, or servicing your engine or equipment to avoid personal injury or property damage. Fuel and its vapors are extremely flammable and explosive. Always handle fuel with extreme care.
WARNING: Always read the engine and equipment manual(s) before starting, operating, or servicing your engine or equipment to avoid personal injury or property damage. Fuel and its vapors are extremely flammable and explosive. Always handle fuel with extreme care.
See an authorized dealer or contact Briggs & Stratton if you are unsure of any procedure or have additional questions. Find all Engine Safety Warnings
Step 1: Removing the Carburetor
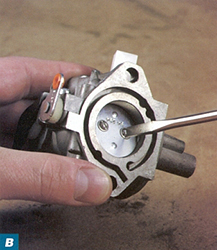
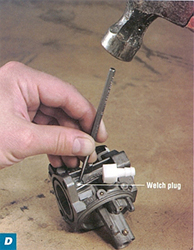
Step 2: Disassembling A Float-Type Carburetor
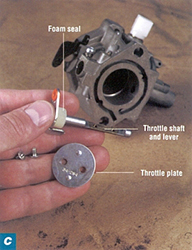
Step 3: Inspecting the Carburetor
Step 4: Inspecting Air-Fuel Mixture Screws
Step 5: Reassembling the Small Engine Carburetor
Step 6: Attaching The Carburetor & Air Cleaner Assembly


Your carburetor contains a small amount of fuel. Prepare a clean bowl to catch dripping fuel and store small parts. During disassembly, inspect the bowl for dirt and debris to determine the condition of your carburetor.


More Carburetor Repair Resources
2 min read
Looking for the best lawn mower gas or fuel for your outdoor power equipment? Briggs & Stratton experts share their tips for choosing the right...
1 min read
If you notice gas mixed in with your engine oil, you should follow these instructions to address a potential fuel leak in your lawn mower, snow...
2 min read
You can avoid many small engine problems and save money on parts and repairs if you follow a regular maintenance schedule. Make good maintenance a...