


How to test a small engine charging system, battery & alternator?
If you use a key to start your lawn mower, snow blower or outdoor power equipment, the small engine includes an electrical charging system with a battery and alternator.
Common Electrical Charging System Problems
- Hearing a click or groan when starting electric-start engines
- Onboard electronics aren’t operating properly
- Battery won’t charge or is draining too quickly

When experiencing these problems, you may need to perform tests to determine if your battery is dead or your alternator isn’t functioning properly. Follow these instructions to check your electrical charging system.
Is Your Lawn Mower or Small Engine Battery Dead?
Alternator Test on Your Small Engine
![]() WARNING: Always read the engine and equipment manual(s) before starting, operating, or servicing your engine or equipment to avoid personal injury or property damage. See an authorized dealer or contact Briggs & Stratton if you are unsure of any procedure or have additional questions. Find all Engine Safety Warnings
WARNING: Always read the engine and equipment manual(s) before starting, operating, or servicing your engine or equipment to avoid personal injury or property damage. See an authorized dealer or contact Briggs & Stratton if you are unsure of any procedure or have additional questions. Find all Engine Safety Warnings
Improper use of the battery and charger can result in an explosion and burn hazard. Follow the instructions provided by the battery and battery charger manufacturers
- Always wear safety glasses
- Service batteries in a well ventilated area away from flames or sparks or other ignition sources
- Do not tip the battery or remove any vent caps
If your battery won’t hold a charge, connect it to the charger. If it isn’t fully charged within 8 hours, your lawn mower battery is dead and you’ll need to replace it.
If your battery does charge fully, the charge should not drain if it isn’t in use. Troubleshoot continued problems by using a multi-tester to see if your battery drains power while not in use. If it holds the charge through testing, you may have an issue with the alternator.
Alternators power the small engine while it is running, keeping the battery charged by circulating power back back through the system.
For the easiest alternator test, simply turn on the headlights to your lawn mower or outdoor power equipment. Then, turn off the engine. If the lights dim, the alternator works. If not, it doesn’t.
If this isn’t an option, follow these steps on how to test alternators.
Step 1: Attach a Multi-Tester to Your Engine

Connect multi-tester to your engine based on your alternator type.
You can determine this by the color of the wires - either AC volts or DC amps. These wires extend beneath the blower housing and are connected to the stator. For Briggs & Stratton engines, you can match up the wires and alternator’s configuration with your Alternator Identification Chart. Once you find a match, find the AC/DC setting in the upper right hand corner (outlined here in red).
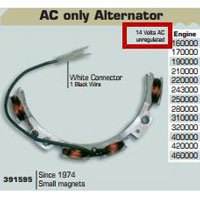
If you need assistance in identifying the style of alternator installed on your engine, please review our Alternator Specifications (PDF), download your illustrated parts list or contact a Briggs & Stratton dealer or the relevant product manufacturer.
Once you have your proper setting identified:
- Set the multi-tester dial to AC VOLTS or DC AMPS.
- Insert the black multi-tester lead into the tester's COM receptacle.
- For AC VOLTS, connect the other end to ground, such as an engine bolt or cylinder fin.
- For DC AMPS, connect the other end to the battery’s positive terminal. (NOTE: The battery must be grounded to the equipment frame of the engine block to create a complete circuit.)
- Insert the red lead on the multi-tester into the tester's receptacle (labeled AC VOLTS or AMPS).
- Connect the red lead to the appropriate stator output wire. See illustrations below to see that your multi-tester is properly attached
AC Volts Test

- Start the engine and let it run for several minutes to reach its operating temperature.
- Using a tachometer (service part number 19598), set the engine test speed and check the reading on the multi-tester. Unless specified, all tests should be carried out with the engine running at 3600 RPM.
- Compare your multi-tester reading against the recommended voltage (amps or volts) listed in the using the Alternator Identification Chart, Alternator Specifications or equipment manual.
- Turn off the engine and disconnect the tester from your equipment.
If your results do not match the specifications, you will need to replace your alternator stator in AC VOLT alternators. For DC Amp alternators, replacing the stator, diode or regulator may be required.