


How to test and repair small engine ignition system problems?
Is there no spark in the engine of your lawn mower, snow blower or outdoor power equipment? Follow this guide to test your ignition system - including coil, switch & module - to identify any problems and troubleshoot repairs.
If you know your specific problem, jump down to the section for step-by-step instructions.
How Do Ignition Systems Work in Small Engines & Lawn Mowers?
Servicing Spark Plug Problems
How to Test the Ignition Coil in Your Small Engine
Testing & Replacing a Stop Switch
Ignition Module Failure
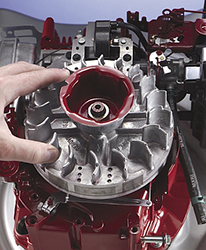
How To Inspect the Flywheel & Key
![]() WARNING: Always read the engine and equipment manual(s) before starting, operating, or servicing your engine or equipment to avoid personal injury or property damage. See an authorized dealer or contact Briggs & Stratton if you are unsure of any procedure or have additional questions. Find all Engine Safety Warnings
WARNING: Always read the engine and equipment manual(s) before starting, operating, or servicing your engine or equipment to avoid personal injury or property damage. See an authorized dealer or contact Briggs & Stratton if you are unsure of any procedure or have additional questions. Find all Engine Safety Warnings

The ignition system is the starting system for your small engine. Whether you start the engine with a pull rope or the turn of a key on an electric start motor, you're relying on the ignition system to produce a spark inside the combustion chamber.
Small Engine Ignition Parts
- Flywheel with magnets
- Coil or Armature
- Push Button starting or Pull Cords (depending on your engine type)
- Spark Plug Lead
- Spark Plugs
When you start your lawn mower or small engine, you turn the flywheel and its magnets pass the coil (or armature). This creates a spark. The ignition system coordinates the timing so that the spark will ignite the air-fuel mixture in the combustion chamber just as it reaches maximum compression in each engine cycle- thus, maximizing the engine’s power.
Once the engine is running, the flywheel keeps rotating, the magnets keep passing the coil and the spark plug keep firing based on a specific timing.
Types of Ignition Systems
- Solid-state systems: the more modern option, these systems use a tiny transistor in the coil or armature to close the electrical circuit that travels through the spark plug lead to the spark plug(s).
- Breaker point systems: used on engines made before 1980, these systems use a mechanical switch instead of a transistor to close the electrical circuit used to produce a spark.
Common Flywheel Problems
If you are experiencing ignition timing issues, this is most often due to a sheared flywheel key. You can also test the flywheel magnets for any potential issues.
For information regarding this, please visit our Inspecting the Flywheel and Key FAQ.
Common Spark Plug Problems
- The required spark plug gap and voltage can vary depending on temperature, altitude and your engine settings.
- Old, damaged or fouled spark plugs can also require service or replacement
![]() Safety Warnings:
Safety Warnings:
Stay clear of any rotating, moving parts, or other hazardous areas whenever attempting to start the engine or equipment.
The coil is probably the easiest thing to check and therefore the first thing to check when embarking upon ignition system troubleshooting.
Testing the Coil or Armature
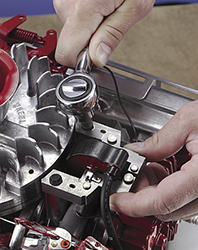
- Step 1: Clip one end of the spark tester (service part number 19368) to the ignition cable and the other grounded to the cylinder head as shown below.

- Step 2: Spin the flywheel rapidly (at least 350 RPM) and watch for spark in the tester window.
If the spark jumps the tester gap, your ignition coil is working fine. If not, it needs to be replaced.
Engine quits while running? Hook the tester up between the ignition cable and the spark plug and start the engine. When it stops, monitor the window.
Common Mistakes When Testing Coils
- Be sure to unhook the coil from the equipment wiring harness as well as the engine's wiring harness and use the spark tester. Many a technician is fooled into replacing a good coil because the coil grounding lead was shorting out against a piece of sheet metal.
- DO NOT attach the tester to the spark plug for this test. The engine may start. Without the grounding lead installed, you won't be able to turn it off.
Replacing Ignition Coils or Armatures

An ignition armature must be set at a precise distance from the flywheel. Your engine repair manual will provide the proper gap for your engine. Common armature gap ranges are .006 - .010" and .010 - .014". Armatures are often packaged with a shim to assist in setting the gap. Index cards of the proper thickness also work well.
- Unhook the spark plug wire and secure it, removing any batteries, if equipped.
- Remove the old ignition coil (armature) mounting screws.

- Then, disconnect the stop switch wire from the flywheel brake and remove the coil.
- Attach a replacement coil from the original engine manufacturer, using mounting screws.
- Then, push the coil (armature) away from the flywheel and tighten one screw.
- Turn the flywheel so the magnets are on the opposite side from the ignition coil (armature).
- Place the appropriate shim between the rim of the flywheel and the ignition armature. While holding the shim, turn the flywheel until the magnets are directly adjacent to the armature

- Loosen the tight screw so the magnets pull the ignition armature against the flywheel and shim. Then, tighten both mounting screws and rotate the flywheel until the shim slips free.
- Reconnect the stop switch.

Additional questions? Please consult a Briggs & Stratton Service Dealer for conversion kit and installation.
![]() Safety Warning: Stay clear of any rotating, moving parts, or other hazardous areas whenever attempting to start the engine or equipment.
Safety Warning: Stay clear of any rotating, moving parts, or other hazardous areas whenever attempting to start the engine or equipment.
- Step 1: Insert the spark plug lead on one end of a spark tester and attach the tester's alligator clip to ground, such as an engine bolt (see image below).

- Step 2: Place the equipment stop switch control in the OFF or STOP position. If the engine is not connected to the equipment, ground the stop switch wire to the cylinder.
- Step 3: Attempt to start the engine using the rewind cord or key (if equipped).
There should be no spark. If a spark appears, inspect the stop switch for damage. Consult your authorized service dealer if you find a faulty switch. - Step 4: Place the stop switch control in RUN or START position.
If the engine is not connected to the equipment, make sure the stop switch wire is not grounded. - Step 5: Attempt to start the engine.
A spark should be visible in the tester. If no spark appears, check for broken wires, shorts, grounds or a defective stop switch.
Once you have confirmed that the stop switch is working, reconnect the spark plug lead.
If your ignition start or push button start needs replacing, consult a Briggs & Stratton dealer near you.
Because the ignition module is electronic and does not utilize moving components, it is normally one of the most reliable part of the engine. When it does fail, it is usually due to heat caused from improper wiring of the ground wire to battery voltage.
If the engine does not produce spark, other areas of the ignition system should be checked before focusing on the ignition module as source of failure (see above).
If no fault is discovered in the above mentioned areas, the ignition module itself may need to be examined. To best determine the cause of failure, please consult an Authorized Dealer.